IBM Circuit function
APIリファレンスを参照してください
注意
- Qiskit Functionsは、IBM Quantum® Premium Plan、Flex Plan、およびOn-Prem(IBM Quantum Platform API経由)Planのユーザーのみが利用できる実験的な機能です。プレビューリリースの状態であり、変更される可能性があります。
概要
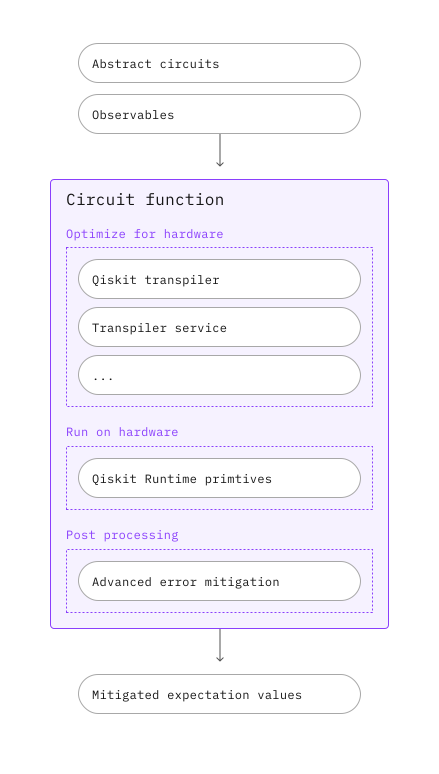
IBM® Circuit functionは、抽象PUBを入力として受け取り、緩和された期待値を出力として返します。このCircuit functionには、研究者がアルゴリズムやアプリケーションの発見に集中できるよう、自動化されたカスタマイズパイプラインが含まれています。
説明
PUBを送信すると、抽象Circuitとオブザーバブルが自動的にトランスパイルされ、ハードウェア上で実行され、後処理によって緩和された期待値が返されます。これを実現するために、以下のツールを組み合わせています:
- Qiskit Transpiler Service:AIによるトランスパイルパスとヒューリスティックなトランスパイルパスの自動選択により、抽象Circuitをハードウェア最適化されたISA Circuitに変換します
- ユーティリティスケールの計算に必要なエラー抑制と緩和:測定とゲートのtwirling、ダイナミカルデカップリング、Twirled Readout Error eXtinction(TREX)、Zero-Noise Extrapolation(ZNE)、Probabilistic Error Amplification(PEA)を含みます
- Qiskit Runtime Estimator:ISA PUBをハードウェア上で実行し、緩和された期待値を返します
はじめに
APIキーを使って認証を行い、以下のようにQiskit Functionを選択します。(このスニペットは、すでにアカウントを保存済みであることを前提としています。)
# Added by doQumentation — required packages for this notebook
!pip install -q qiskit qiskit-ibm-catalog qiskit-ibm-runtime
from qiskit_ibm_catalog import QiskitFunctionsCatalog

catalog = QiskitFunctionsCatalog(channel="ibm_quantum_platform")

function = catalog.load("ibm/circuit-function")
例
まず、この基本的な例を試してみてください:
from qiskit.circuit.random import random_circuit
from qiskit_ibm_runtime import QiskitRuntimeService

# You can skip this step if you have a target backend, e.g.
# backend_name = "ibm_brisbane"
# You'll need to specify the credentials when initializing QiskitRuntimeService, if they were not previously saved.
service = QiskitRuntimeService()
backend = service.least_busy(operational=True, simulator=False)

circuit = random_circuit(num_qubits=2, depth=2, seed=42)
observable = "Z" * circuit.num_qubits
pubs = [(circuit, observable)]

job = function.run(
    # Use `backend_name=backend_name` if you didn't initialize a backend object
    backend_name=backend.name,
    pubs=pubs,
)
Qiskit Functionワークロードのステータスを確認したり、以下のように結果を取得したりできます:
print(job.status())
result = job.result()
QUEUED
結果はEstimatorの結果と同じ形式です:
print(f"The result of the submitted job had {len(result)} PUB\n")
print(
    f"The associated PubResult of this job has the following DataBins:\n {result[0].data}\n"
)
print(f"And this DataBin has attributes: {result[0].data.keys()}")
print(
    f"The expectation values measured from this PUB are: \n{result[0].data.evs}"
)
The result of the submitted job had 1 PUB

The associated PubResult of this job has the following DataBins:
 DataBin(evs=np.ndarray(<shape=(), dtype=float64>), stds=np.ndarray(<shape=(), dtype=float64>), ensemble_standard_error=np.ndarray(<shape=(), dtype=float64>))

And this DataBin has attributes: dict_keys(['evs', 'stds', 'ensemble_standard_error'])
The expectation values measured from this PUB are:
1.02116704805492
緩和レベルの例
以下の例は、緩和レベルの設定方法を示しています:
options = {"mitigation_level": 2}

job = function.run(backend_name=backend.name, pubs=pubs, options=options)
以下の例では、緩和レベルを1に設定すると最初はZNE緩和がオフになりますが、zne_mitigationをTrueに設定するとmitigation_levelの関連設定が上書きされます。
options = {"mitigation_level": 1, "resilience": {"zne_mitigation": True}}
出力例
以下のコードスニペットはPrimitiveResult(および関連するPubResult)の形式を説明しています。
print(f"The result of the submitted job had {len(result)} PUB")
print(
    f"The expectation values measured from this PUB are: \n{result[0].data.evs}"
)
print(f"And the associated metadata is: \n{result[0].metadata}")
The result of the submitted job had 1 PUB
The expectation values measured from this PUB are:
1.02116704805492
And the associated metadata is:
{'shots': 4096, 'target_precision': 0.015625, 'circuit_metadata': {}, 'resilience': {}, 'num_randomizations': 32}
エラーメッセージを取得する
ワークロードのステータスがERRORの場合、以下のようにjob.result()を使用してエラーメッセージを取得し、デバッグに役立ててください:
job = function.run(
    backend_name="bad_backend_name", pubs=pubs, options=options
)

print(job.result())
サポートを受ける
IBM Quantumサポートにお問い合わせいただき、以下の情報をご提供ください:
- Qiskit Function ジョブID(
qiskit-ibm-catalog)、job.job_id - 問題の詳細な説明
- 関連するエラーメッセージやコード
- 問題を再現する手順
次のステップ
おすすめ
- IBM Circuit functionを使ったエラー緩和チュートリアルを試してみてください。
- このQiskit FunctionのAPIリファレンスを参照してください。